

Getting Started
1. Module Objectives
At the end of this module you will..
Have a working installation of BlueJ, customized for this class
Know what a Micro World is and how to traverse one
Know the ordering a program executes statements in
Java Java Java! –> Section 1.4
Think Java –> Section 4.4
Know some basic vocabulary like what methods, objects, and pre and post conditions
Java Java Java! –> Section 1.4
Think Java –> Sections 1.3 - 1.9 (this includes a handy glossary)
Know how to create objects and methods
Java Java Java! –> Sections 1.4 - 1.5
Think Java –> All of chapter 10
Know how to write a comment
Java Java Java! –> Section 1.2
Have a working installation of BlueJ, customized for this class
1.1. Getting Set Up
Before anything else you’ll need to install a piece of software you’ll be using all year: BlueJ. Below are the instructions for getting that set up.
Instructions will eventually go here
Once you have everything set up, try following this tutorial to make sure everything is working.
1.2. Micro Worlds
1.2.1. Introducing LightBot
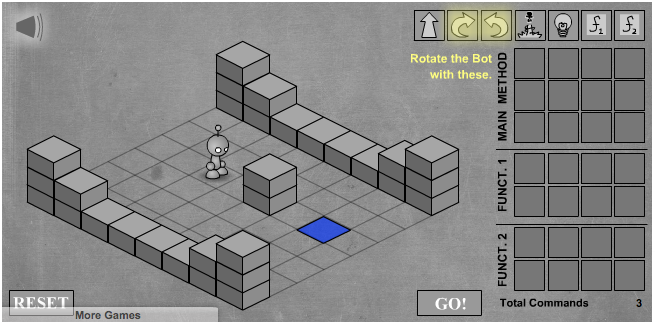
Lightbot is a very simple robot programming simulation game. It runs right in your web browser, and looks like this:

In the Light-Bot game, you create a program to control a little robot to solve a simple task in the miniature block-based world where the Light-Bot exists. The programming in Light-Bot is iconic. The icons at the top right of the game’s display represent instructions to the robot. Each icon instructs the robot to do something–go one square forward, turn right, turn left, jump forward, and light up the square the robot standing on. Of course the square will only light up if the robot is on a blue square. The speaker icon in the upper left corner will allow you to toggle the game sound on and off. The reset button in the lower left corner will delete all of your instructions and start the level over.
Your task on each level of the Light-Bot game is to get the robot to light up all of the blue squares. To create a program to control the robot simply drag the icons at the top and drop them on the main method squares left to right.
TODO: This isn’t free. We’ll need to figure something out there You can try Lightbot by clicking on the link below. The flash game will no longer work in your browser, but you can download the game as an app or on your desktop by scrolling down to where it says “Ages 9 and Up” and clicking the platform of your choice: Try Lightbot Here!
The Light-Bot game illustrates several basic programming concepts. The robot itself is an object, and we can request it to perform specific actions that it knows how to carry out. We can write a series of these requests down as a program. The series of actions that we write down is a plan for solving a specific problem (an algorithm).
Exercise 1
Play the first two levels of Light-Bot to try things out.
1.2.2. From Light-Bot to Micro Worlds
The Light-Bot game is an example of a micro-world. A micro-world is a miniature simulated environment that is populated with one or more objects with clearly defined behaviors, and that can be visually represented so that you can see how the objects move around and behave over time.
Micro-worlds typically use a grid to represent locations in the simulated world. You can see this in the Light-Bot game, where the robot walks on square tiles. In this course, we will use the same approach. We can refer to any location on a grid using x and y coordinates:
TODO: Find a way to make the gridlines appear
X Coordinates |
||||||
|---|---|---|---|---|---|---|
Coords |
0 |
1 |
2 |
3 |
||
0 |
||||||
1 |
xxxxxxxxxxxx |
|||||
2 |
||||||
3 |
||||||
We will use a variation of Cartesian coordinates to write any location as an (x, y) pair, where x (the first coordinate) represents the distance from the origin horizontally, and y (the second coordinate) represents the distance from the origin vertically. The only catch is that the y axis points downward in our grid, making this a left-handed Cartesian plane. We use a left-handed orientation for our axes because that convention is predominant in computer programming contexts (even though it is the opposite of what is typical in studying geometry!).
So the highlighted cell in the grid shown above is at location (4, 2), since it is 4 cells horizontally to the right of the origin, and 2 cells vertically down from the origin. Also notice that the origin (0, 0) is explicitly represented in our grid and is located at the top left corner. The grid above is 10 by 10 in size, where coordinates run from 0 up to and including 9. This means we will always used zero-based indexing when referring to grid positions–i.e., we always start counting from zero at the origin (top left), rather than starting with one.
1.2.3. A Bit More Light Bot
If you only played the first two levels of Light-Bot, there’s definitely more interesting stuff you haven’t seen! As the levels progress, the puzzles get more complicated. They are harder to solve using the limited number of slots in the program memory for the little robot. Fortunately, the Light-Bot game provides a few more icons for you to use: f1 and f2. The f1 and f2 icons represent the two functions (icon areas) below the main method in the Light-Bot game. These two functions are where you will place instructions that the robot will need to perform multiple times. Anywhere you place the f1 or f2 icon, the robot will perform the entire sequence of actions associated with that function. This will allow you to build more complex programs which are necessary to solve the more challenging tasks in the later levels.
Exercise 2
Return to the Light-Bot game above in Exercise 1. Continue to play through Level 7. Once you have completed Level 7, stop. You’ll return to finish Level 8 in the next exercise.
1.2.4. Textually Representing Programs
Computer programs are most often written in textual form–in fact, one of the most important goals of programming is to write programs so that they communicate well to other people. So let’s look at how we can represent Light-Bot puzzle solutions as text.
At its most basic, a computer program is simply a sequence of instructions for a computer to follow. Our Light-Bot level solutions are just that: programs. All we need in order to write them textually is names that correspond to the icons. For example, if we call our little robot andy, we could use the following names to correspond to his icons (from left to right):
andy.move()
andy.turnRight()
andy.turnLeft()
andy.jump()
andy.turnLightOn()
andy.f1()
andy.f2()
Each action is phrased as a request to an object that performs the desired behavior. So each request goes to our robot, andy. For example, consider Level 2:
One solution to this level is:
Exercise 3
To Turn In Return to the Light-Bot game above in Exercise 1. Complete Level 7 if you have not already done so. Once you have completed Level 7, think carefully about your solution for Level 8. Compose your solution for Level 8 but don’t run it yet. Write down your solution for Level 8 in textual form:
main:
  put your instructions here
f1:
  put your instructions here
f2:
  put your instructions here
After writing down your solution, then run it. If it does not work the way you planned, revise it and revise your textual version, too before running it again. Your goal is to have a textual representation of your final solution to Level 8, which will be your answer to this Exercise.
1.3. Moving from Micro Worlds to Programming
1.3.1. What Does Light-Bot Say About Programming?
The Light-Bot game illustrates several basic programming concepts:
Object
Method
Method Call
State
Algorithm
Program
Source Code
Interpreter
In this course, we are going to focus on learning object-oriented programming in Java. This section describes several general concepts about object-oriented programs that we have seen in this first example. As you read subsequent chapters, refer back to this chapter to review the meaning of important words and phrases.
1.3.2. Object-Oriented Programming (From Java, Java, Java!)
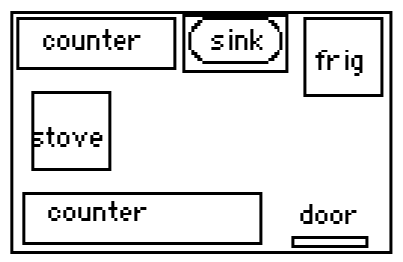
A Java program, and any object-oriented program, is a collection of interacting objects that models a collection of real-world objects. Think of the model that a kitchen designer might use to layout your new kitchen It will contain objects that represent the various kitchen appliances and cabinets. Each object in the model is a simplified version of the corresponding real object. For example, a rectangle might be used to represent the refrigerator.
A kitchen model is mostly static It doesn’t change. Once put into place, its various objects just stand there in a certain relation to each other. By contrast, a computer program is dynamic It doesn’t change. Once put into place, its various objects just stand there in a certain relation to each other. By contrast, a computer program is anthropomorphic , a big word that means “like people.” If we are eating together and I want you to pass me the salt, I say, “Please pass me the salt,” and you invariably comply. Similarly, when you (Student X) put your ATM card into an ATM machine, the ATM object asks the bank’s database object “Give me Student X’s bank account object” and the database invariably complies. If you tell the ATM you want to withdraw $100 dollars it tells your bank account object to deduct $100 from your current balance. And so it goes. Both you and your bank account are changed objects as a result of the transaction.
So what is an object? Just as in the real world, an object is any thing whatsoever. An object can be a physical thing, such as a Car, or a mental thing, such as an Idea. It can be a natural thing, such as an Animal, or an artificial, human-made thing, such as a ATM. A program that manages an ATM would involve BankAccounts and Customer objects. A chess program would involve a Board1 object and :code:`ChessPiece objects.
1.3.3. Attributes and Values (From Java, Java, Java!)
Just as with real objects, the objects in our programs have certain characteristic attributes. For example, an ATM `object would have a current amount of cash that it could dispense. A :code:`ChessPiece object might have a pair of row and column attributes that specify its position on the chess board. Notice that an object’s attributes are themselves objects. The ATM’s cash attribute and the chess piece’s row and column attributes are Numbers.
Below is a diagram of two different ATM objects.
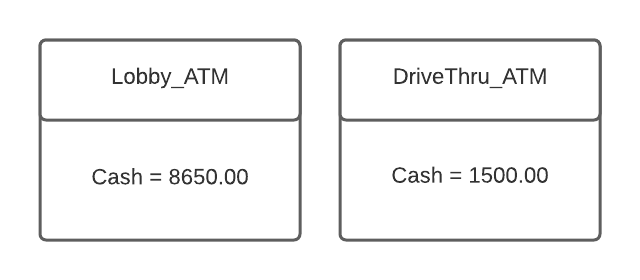
We sometimes refer to the collection of an object’s attributes and values as its state. For example, the current state of the lobby:ATM is $8650.0 in cash. Of course, this is a gross simplification of an ATM’s state, which would also include many other attributes.
1.3.4. Actions (From Java, Java, Java!)
In addition to their attributes, objects also have characteristic actions or behaviors. As we have already said, objects in programs are dynamic. They do things or have things done to them. In fact, programming in Java is largely a matter of getting objects to perform certain actions for us. For example, in a chess program the ChessPieces have the ability to moveTo() a new position on the chess board. Similarly, when a customer pushes the “Current Balance” button on an ATM machine, this is telling the ATM to report() the customer’s current bank balance. (Note how we use parentheses to distinguish actions from objects and attributes.)
1.3.5. Classes (From Java, Java, Java!)
A class is a template for an object. A class encapsulates the attributes and actions that characterize a certain type of object. In an object-oriented program, classes serve as blueprints or templates for the objects that the program uses. We say that an object is an instance of a class. A good analogy here is to think of a class as a cookie cutter and its objects, or instances, as individual cookies. Just as we use the cookie cutter to stamp out cookies of a certain type, in an object-oriented program, we use a definition of a class to create objects of a certain type.
Writing an object-oriented program is largely a matter of designing classes and writing definitions for those classes in Java. Designing a class is a matter of specifying all of the attributes and behaviors that are characteristic of that type of object.
For example, suppose we are writing a drawing program. One type of object we would need for our program is a rectangle. A Rectangle object has two fundamental attributes, a length and a width. Given these attributes, we can define characteristic rectangle actions, such as the ability to calculate its area and the ability to draw itself. Identifying an object’s attributes and actions is the kind of design activity that goes into developing an object-oriented program.
1.3.6. Variables and Methods (From Java, Java, Java!)
Up to this point we have been using the terms attribute and action to describe an object’s features. We will continue to use this terminology when talking in general about objects.
However, when talking about a programming language, the more common way to describe an object’s features are to talk about its variables and methods. A variable, which corresponds to an attribute, is a named memory location that can store a certain type of value. You can think of a variable as a special container that can only hold objects of a certain type.
For example, as the image below shows Rectangle's :code:`length and width are variables that can store a certain type of numeric value known as an int. An int value is a whole number, such as 76 or -5
A method, which corresponds to an action or a behavior, is a named chunk of code that can be called upon or invoked to perform a certain pre-defined set of actions. For example, in our Rectangle object, the calculateArea() method can be called upon to calculate the rectangle’s area. It would do this, of course, by multiplying the rectangle’s length by its width. Similarly, the draw() method can be invoked to draw a picture of the rectangle. It would take the actions necessary to draw a rectangle on the console.
Below is a diagram of two different Rectangle objects with their attribute variables and methods.

1.3.7. Preconditions and Postconditions
Going back to our LightBot example, our Light-Bot can jump when the jump icon is used:
Represented in text, this is the jump() method. This is an example of a method only work under certain conditions: the robot can only jump (up or down) if the square immediately in front of it is exactly one block higher or lower than where the robot is standing. This is a precondition.
Precondition
A precondition for a method is something that is assumed to be true before the method is invoked.
Another example of a method with a preconditon is the turnLightOn() method only works when the robot is standing on a blue square. However, if the robot is indeed standing on a blue square, and then it executes its “turn light on” behavior, then afterward the blue square will be lit. This is an example of a postcondition.
Postcondition
A postcondition for a method is something that is assumed to be true after the method has been executed.
1.3.8. Comments (from Java Java Java)
For this section, lets take a look at a different version of the HelloWorld program seen in the video at the start of this module.
The first thing to notice about the HelloWorld program is the use of comments. A comment is a non-executable portion of a program that is used to document the program. Because comments are not executable instructions they are just ignored by the compiler. Their sole purpose is to make the program easier for the programmer to read.
The HelloWorld program contains examples of two types of Java comments. Any text contained within /* and */ is considered a comment. As you can see in HelloWorld, this kind of comment can extend over several lines and is sometimes called a multiline comment. A second type of comment is any text that follows double slashes (:code`//`) on a line. This is known as a single-line comment because it cannot extend beyond a single line.
When the compiler encounters the beginning marker (/*) of a multiline comment, it skips over everything until it finds a matching end marker (*/). One implication of this is that it is not possible to put one multiline comment inside of another. That is, one comment cannot be nested, or contained, within another comment. The following code
/* This first comment begins and ends on the same line. */
/* A second comment starts on this line ...
   and goes on ...
   and this is the last line of the second comment.
*/
/* A third comment starts on this line ...
    /* This is NOT a fourth comment. It is just
       part of the third comment.
   And this is the last line of the third comment.
*/
*/  This is an error because it is an unmatched end marker.
As you can see from this example, it is impossible to begin a new comment inside an already-started comment because all text inside the first comment, including /*, is ignored by the compiler.
Multiline comments are often used to create a comment block that provides useful documentation for the program. In HelloWorld, the program begins with a comment block that identifies the name of file that contains the program and its author and provides a brief description of what the program does.
For single-line comments, double slashes (//) can be inserted anywhere on a line of code. The result is that the rest of the line is ignored by the compiler. We use single-line comments throughout the HelloWorld program to provide a running commentary of its language elements.
Programming Tip - Use of Comments
A well-written program should begin with a comment block that provides the name of the program, its author, and a description of what the program does.

Java Rule: Comments
Any text contained within
/*and*/, which may span several lines, is considered a comment and is ignored by the compiler. Inserting double slashes (//) into a line turns the rest of the line into a comment.